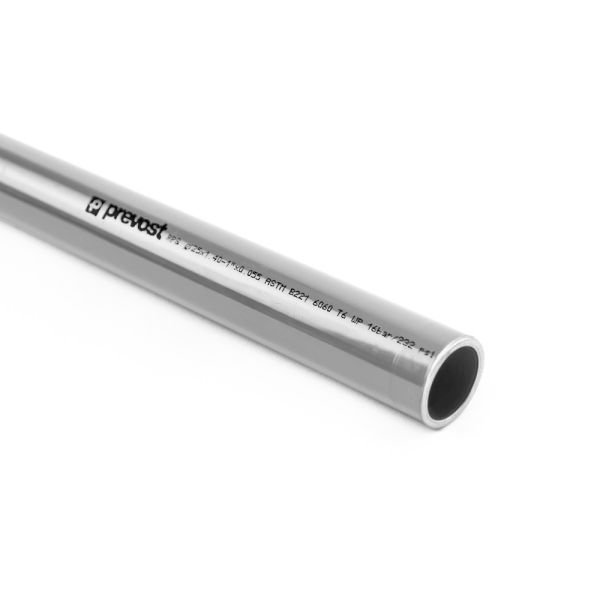
Prevost Grey Aluminium Vacuum Pipe


Technical Specification
- Material: Aluminium. Alloy EN AW 6063 T6 UNI-EN 573-3.
- Suitable For: Vacuum
- Operating Temperature: -20°C to +80°C
- Operating Pressure: 0.98 bar to 16 bar
- External Diameters: Available in Ø16mm to Ø160mm
- Coating: Electrostatic paint for both internal and external surfaces
- Material Density: 2.7 kg/dm³
- Standards Compliance: ISO 8573 for clean air supply and fire classification EN 13501-1
- Certifications: ATEX certified for use in potentially explosive atmospheres (zones 1, 2, 21, and 22)
- Compatible Fittings: Prevost Aluminium Fittings
Not suitable for use with water.
Description
This grey-coated aluminium pipe is purpose-coloured for vacuum applications, providing a clear and reliable means of system identification across industrial installations. Colour-coded grey, it allows engineers and maintenance teams to distinguish vacuum lines at a glance, reducing the risk of misidentification in complex pipework environments.
Constructed from aluminium alloy, the pipe delivers an excellent strength-to-weight ratio, making it significantly lighter than traditional steel alternatives without compromising on mechanical performance. The smooth internal bore minimises pressure drop and promotes laminar flow, ensuring efficient vacuum distribution throughout the system. The internal and external titanium treatments, combined with the electrostatic paint coating, provide robust protection against corrosion and oxidation while also offering resistance to UV exposure and heat. The non-combustible material composition means no fire permit is required during installation, simplifying project planning and compliance.
Key Features
- Aluminium Construction: Alloy EN AW 6060 T6 delivers a high strength-to-weight ratio, offering superior mechanical performance compared to traditional steel piping.
- Smooth Internal Bore: Minimises pressure loss and promotes efficient laminar flow throughout the vacuum distribution network.
- Corrosion Resistance: Rustproof design with internal and external electrostatic paint coating, ensuring long-term durability.
- Grey Colour Coding: Instantly identifies vacuum lines within a system, reducing the risk of misidentification in complex industrial pipework environments.
- Non-combustible Material: No fire permit is required during installation, simplifying compliance and project planning.
- Lightweight and Easy Installation: Simple to cut, chamfer, and assemble using basic tools.
- Compatibility: Works seamlessly with Prevost aluminium fittings for a leak-free and secure system.
- UV and Heat Resistant: Can withstand temperatures from -20°C to +80°C and resist sunlight, ensuring reliable performance in varying environments.
Dimensions

| Product Code | Size (mm) | Length (m) | Wall Thickness (mm) |
| 488356 | 16 | 2.9 | 1.3 |
| 488357 | 20 | 2.9 | 1.3 |
| 488395 | 20 | 5.5 | 1.3 |
| 488358 | 25 | 2.9 | 1.4 |
| 488396 | 25 | 5.5 | 1.4 |
| 488359 | 32 | 2.9 | 1.5 |
| 488397 | 32 | 5.5 | 1.5 |
| 488360 | 40 | 2.9 | 1.8 |
| 488398 | 40 | 5.5 | 1.8 |
| 488361 | 50 | 2.9 | 2.0 |
| 488399 | 50 | 5.5 | 2.0 |
| 488362 | 63 | 2.9 | 2.0 |
| 488400 | 63 | 5.5 | 2.0 |
| 488363 | 80 | 2.9 | 2.4 |
| 488401 | 80 | 5.5 | 2.4 |
| 488364 | 100 | 2.9 | 2.8 |
| 488402 | 100 | 5.5 | 2.8 |
| 488365 | 160 | 2.9 | 4.0 |
| 488403 | 160 | 5.5 | 4.0 |
Installation Instructions
Below is a brief guide to installing Prevost vacuum pipe. For full details, please consult their technical guide which can be found here.
- Cut: Use a pipe cutter to cut the pipe perpendicularly to its axis. Ensure a clean and straight cut to maintain system integrity.
- Chamfer: Chamfer the external edge of the pipe to facilitate insertion into the fitting. Deburr the internal edge to remove any cutting residue that could affect the seal.
- Mark: Mark the pipe to indicate the correct insertion depth. Use alignment marks on the fitting or a tightening wrench to guide the positioning.
- Lubricate: Apply assembly gel to the end of the pipe. This reduces friction and eases insertion into the fitting.
- Assemble: Slightly loosen the nut on the fitting. Insert the pipe into the fitting, rotating slightly to ensure proper seating.
- Tighten: Tighten the fitting nut by hand, then use a wrench to achieve the recommended torque.
Additional Tips for Optimal Installation
- Mounting Height: Install the main network at least 2.5m (8ft) above ground level for safety and accessibility.
- Clamping: Use sliding clamps to secure the pipe. Spacing should follow the manufacturer’s recommendations based on the pipe diameter and environmental temperature.
- Slope for Drainage: Maintain a 1% slope to direct condensates to low points for efficient drainage.
- Pressure Testing: Gradually pressurise the system to 3 bar (45 psi) to check for leaks. Increase pressure incrementally to the maximum operating pressure (16 bar/232 psi) while monitoring for stability.
- Post-Installation Check: After 72 hours, recheck the fittings to ensure the nuts remain fully tightened.
Important Considerations
- Ensure the pipes are level during installation to maintain consistent flow rates.
- Use flexible hoses or expansion kits for systems longer than 50m to accommodate thermal expansion and contraction.
- Only trained professionals should carry out the installation to meet safety and compliance standards.
- Clean the system by pressurising it briefly before adding accessories to remove any debris or shavings.
Sizing a Compressed Air System
Open System | Pressure: 8 bar | Max. pressure drop 5% (0.4 bar) | Max. speed: 10 m/s

| Compressor* | Main Line Length For Open System |
||||||||||||
| Power | Loss | 50m | 100m | 150m | 300m | 500m | 750m | 1000m | 1300m | 1600m | |||
| kW | CV | Nm3/h | Nl/min | Scfm | 164ft | 328ft | 492ft | 984ft | 1640ft | 2460ft | 3280ft | 4265ft | 5249ft |
| 2.2 | 3 | 22 | 367 | 13 | 16 | 16 | 20 | 20 | 25 | 25 | 25 | 25 | 32 |
| 3 | 4 | 30 | 500 | 18 | 16 | 20 | 20 | 25 | 25 | 25 | 32 | 32 | 32 |
| 4 | 5.5 | 40 | 667 | 24 | 20 | 20 | 25 | 25 | 32 | 32 | 32 | 32 | 32 |
| 5.5 | 7.5 | 50 | 834 | 29 | 20 | 25 | 25 | 25 | 32 | 32 | 32 | 40 | 40 |
| 7.5 | 10 | 70 | 1167 | 41 | 25 | 25 | 25 | 32 | 32 | 40 | 40 | 40 | 40 |
| 11 | 15 | 100 | 1667 | 59 | 25 | 32 | 32 | 32 | 40 | 40 | 40 | 50 | 50 |
| 15 | 20 | 150 | 2500 | 88 | 32 | 32 | 40 | 40 | 50 | 50 | 50 | 50 | 63 |
| 18 | 25 | 180 | 3000 | 106 | 32 | 32 | 40 | 40 | 50 | 50 | 50 | 63 | 63 |
| 22 | 30 | 220 | 3667 | 129 | 40 | 40 | 40 | 50 | 50 | 50 | 63 | 63 | 63 |
| 26 | 35 | 260 | 4334 | 153 | 40 | 40 | 40 | 50 | 50 | 63 | 63 | 63 | 63 |
| 30 | 40 | 350 | 5000 | 176 | 40 | 40 | 50 | 50 | 63 | 63 | 63 | 63 | 80 |
| 37 | 50 | 370 | 6167 | 218 | 50 | 50 | 50 | 63 | 63 | 63 | 80 | 80 | 80 |
| 45 | 60 | 450 | 7500 | 265 | 50 | 50 | 50 | 63 | 63 | 80 | 80 | 80 | 80 |
| 55 | 75 | 550 | 9167 | 324 | 63 | 63 | 63 | 63 | 80 | 80 | 80 | 80 | 100 |
| 75 | 100 | 750 | 12500 | 441 | 63 | 63 | 63 | 80 | 80 | 80 | 100 | 100 | 100 |
| 90 | 120 | 900 | 15000 | 529 | 80 | 80 | 80 | 80 | 80 | 100 | 100 | 100 | 100 |
| 110 | 150 | 1100 | 18334 | 647 | 80 | 80 | 80 | 80 | 100 | 100 | 100 | 100 | 160 |
| 130 | 175 | 1300 | 21667 | 765 | 80 | 80 | 80 | 80 | 100 | 100 | 100 | 160 | 160 |
| 160 | 215 | 1600 | 26667 | 941 | 100 | 100 | 100 | 100 | 100 | 160 | 160 | 160 | 160 |
| 200 | 270 | 2000 | 33334 | 1176 | 100 | 100 | 100 | 100 | 160 | 160 | 160 | 160 | 160 |
| 250 | 340 | 2500 | 41667 | 1471 | 160 | 160 | 160 | 160 | 160 | 160 | 160 | 160 | 160 |
| 300 | 405 | 3000 | 50000 | 1765 | 160 | 160 | 160 | 160 | 160 | 160 | 160 | 160 | 160 |
| 350 | 475 | 3500 | 58334 | 2059 | 160 | 160 | 160 | 160 | 160 | 160 | 160 | 160 | 160 |
| 400 | 540 | 4000 | 66667 | 2353 | 160 | 160 | 160 | 160 | 160 | 160 | 160 | 160 | |
| 450 | 600 | 4500 | 75000 | 2647 | 160 | 160 | 160 | 160 | 160 | 160 | 160 | ||
| 500 | 700 | 5000 | 83334 | 2941 | 160 | 160 | 160 | 160 | 160 | 160 | |||
*Values may vary slightly from the compressor manufacturer’s data.
Closed System | Pressure: 8 bar | Max. pressure drop 5% (0.4 bar) | Max. speed: 10 m/s

| Compressor* | Main Line Length For Closed System |
|||||||||||||
| Power | Loss | 50m | 100m | 150m | 300m | 500m | 750m | 1000m | 1300m | 1600m | 2000m | |||
| kW | CV | Nm3/h | Nl/min | Scfm | 164ft | 328ft | 492ft | 984ft | 1640ft | 2460ft | 3280ft | 4265ft | 5249ft | 6562ft |
| 2.2 | 3 | 22 | 367 | 13 | 16 | 16 | 16 | 16 | 20 | 20 | 20 | 20 | 25 | 25 |
| 3 | 4 | 30 | 500 | 18 | 16 | 16 | 16 | 20 | 20 | 20 | 25 | 25 | 25 | 25 |
| 4 | 5.5 | 40 | 667 | 24 | 16 | 16 | 20 | 20 | 25 | 25 | 25 | 25 | 32 | 32 |
| 5.5 | 7.5 | 50 | 834 | 29 | 16 | 20 | 20 | 25 | 25 | 25 | 25 | 32 | 32 | 32 |
| 7.5 | 10 | 70 | 1167 | 41 | 20 | 20 | 20 | 25 | 25 | 32 | 32 | 32 | 32 | 32 |
| 11 | 15 | 100 | 1667 | 59 | 20 | 25 | 25 | 25 | 32 | 32 | 32 | 40 | 40 | 40 |
| 15 | 20 | 150 | 2500 | 88 | 25 | 25 | 32 | 32 | 40 | 40 | 40 | 40 | 50 | 50 |
| 18 | 25 | 180 | 3000 | 106 | 25 | 32 | 32 | 32 | 40 | 40 | 40 | 50 | 50 | 50 |
| 22 | 30 | 220 | 3667 | 129 | 25 | 32 | 32 | 40 | 40 | 40 | 50 | 50 | 50 | 50 |
| 26 | 35 | 260 | 4334 | 153 | 32 | 32 | 32 | 40 | 40 | 50 | 50 | 50 | 50 | 63 |
| 30 | 40 | 350 | 5000 | 176 | 32 | 32 | 40 | 40 | 50 | 50 | 50 | 50 | 63 | 63 |
| 37 | 50 | 370 | 6167 | 218 | 32 | 40 | 40 | 40 | 50 | 50 | 63 | 63 | 63 | 63 |
| 45 | 60 | 450 | 7500 | 265 | 40 | 40 | 40 | 50 | 50 | 63 | 63 | 63 | 63 | 63 |
| 55 | 75 | 550 | 9167 | 324 | 40 | 40 | 50 | 50 | 63 | 63 | 63 | 63 | 80 | 80 |
| 75 | 100 | 750 | 12500 | 441 | 50 | 50 | 50 | 63 | 63 | 63 | 80 | 80 | 80 | 80 |
| 90 | 120 | 900 | 15000 | 529 | 50 | 50 | 50 | 63 | 63 | 80 | 80 | 80 | 80 | 80 |
| 110 | 150 | 1100 | 18334 | 647 | 63 | 63 | 63 | 63 | 80 | 80 | 80 | 80 | 100 | 100 |
| 130 | 175 | 1300 | 21667 | 765 | 63 | 63 | 63 | 63 | 80 | 80 | 80 | 100 | 100 | 100 |
| 160 | 215 | 1600 | 26667 | 941 | 63 | 63 | 63 | 80 | 80 | 100 | 100 | 100 | 100 | 100 |
| 200 | 270 | 2000 | 33334 | 1176 | 80 | 80 | 80 | 80 | 100 | 100 | 100 | 100 | 160 | 160 |
| 250 | 340 | 2500 | 41667 | 1471 | 80 | 80 | 80 | 80 | 100 | 100 | 100 | 160 | 160 | 160 |
| 300 | 405 | 3000 | 50000 | 1765 | 100 | 100 | 100 | 100 | 100 | 100 | 160 | 160 | 160 | 160 |
| 350 | 475 | 3500 | 58334 | 2059 | 100 | 100 | 100 | 100 | 100 | 160 | 160 | 160 | 160 | 160 |
| 400 | 540 | 4000 | 66667 | 2353 | 100 | 100 | 100 | 100 | 160 | 160 | 160 | 160 | 160 | 160 |
| 450 | 600 | 4500 | 75000 | 2647 | 160 | 160 | 160 | 160 | 160 | 160 | 160 | 160 | 160 | 160 |
| 500 | 700 | 5000 | 83334 | 2941 | 160 | 160 | 160 | 160 | 160 | 160 | 160 | 160 | 160 | 160 |
| 600 | 810 | 6000 | 100000 | 3529 | 160 | 160 | 160 | 160 | 160 | 160 | 160 | 160 | 160 | 160 |
| 700 | 950 | 7000 | 116667 | 4118 | 160 | 160 | 160 | 160 | 160 | 160 | 160 | 160 | 160 | |
| 800 | 1080 | 8000 | 133334 | 4706 | 160 | 160 | 160 | 160 | 160 | 160 | 160 | |||
*Values may vary slightly from the compressor manufacturer’s data.
If you require any further information, our excellent customer service team is here to help so please call us on 01794 835835.