Fernco Penstock

Technical Specification
- Mounting: Wall-mounted
- Size Range: DN100 to DN600 (larger sizes available on request)
- Materials:
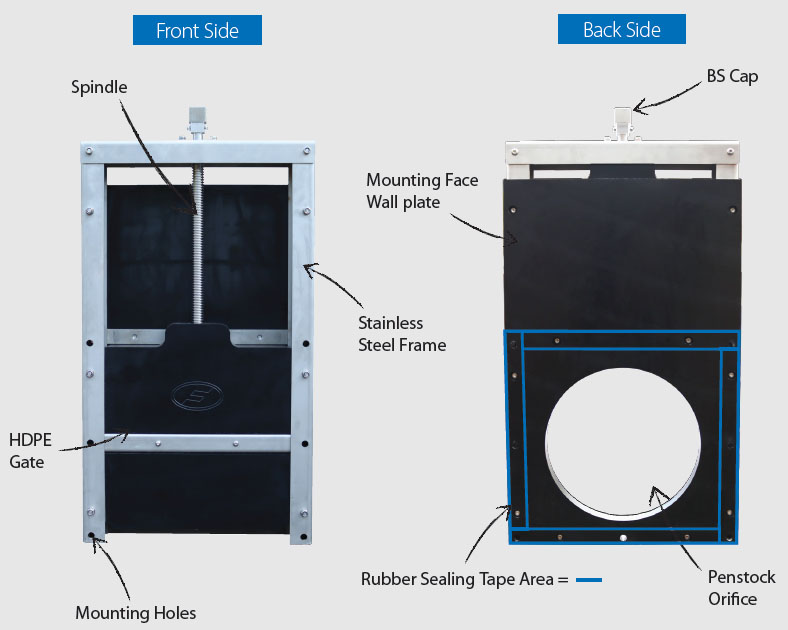
- Gate & wall plate: PE500 HDPE
- Frame, reinforcement & spindle: 316 Stainless Steel
- Seal: EPDM rubber sealing tape
- Operation: Clockwise to close; non-rising spindle standard
- Sealing Class: Conforms to DIN19569-4, Class 4; BS7775
- Pressure Rating: 6 mwc (on and off seating)
- Temperature Range: Continuous 80°C, intermittent 100°C
- Fixings: Chemical anchor bolts and sealing tape included
- Accessories Available: Handwheel, tee key, guide brackets, extension spindles
Description
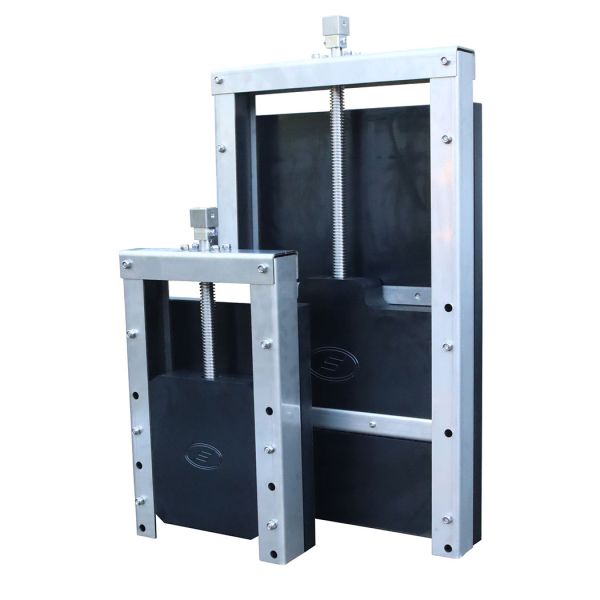
Designed for efficient control of water and wastewater flow, this HDPE wall-mounted penstock provides a durable, corrosion-resistant solution for a wide range of drainage and process applications. Constructed from PE500-grade high-density polyethylene with 316 stainless steel components, it offers outstanding strength, longevity, and environmental resilience. With a lightweight, rigid frame and EPDM sealing system, this valve ensures minimal leakage and maximum durability without requiring grout or complex installation processes. Ideal for use in water treatment plants, industrial effluent control, flood defences, and hydropower installations, it’s available in a core range of DN100–DN600 sizes, with bespoke options on request.
Key Features
- Controls the flow of water between isolated zones
- Easy to install with no grout required between wall and frame
- PE500-grade HDPE construction for improved impact resistance
- 316 stainless steel hardware for long-term corrosion protection
- Clockwise closing with a non-rising spindle (rising version available)
- Lightweight for easier transport and safe installation
- EPDM sealing strip ensures reliable, low-leakage performance
- Fully recyclable and UV stable – won’t become brittle in sunlight
- Reduced head loss compared to traditional cast iron alternatives
- Suitable for harsh environments including marine and industrial sites
Dimensions & Design
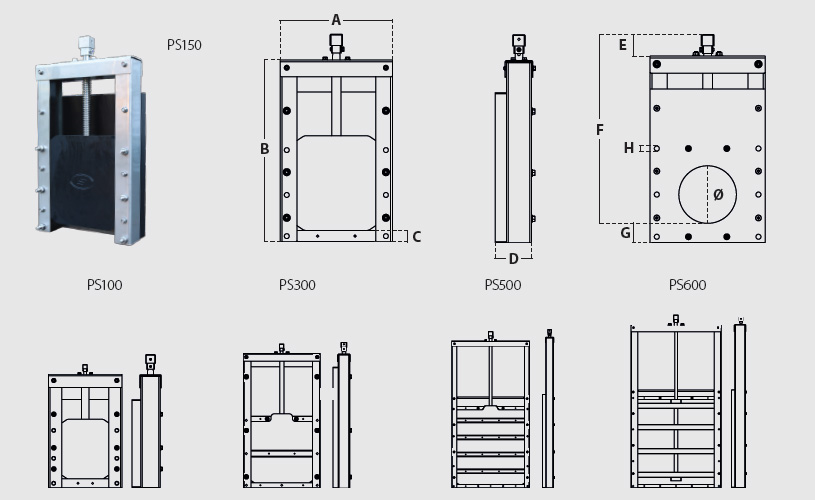
| SKU | Fernco Code | Diameter | A (mm) | B (mm) | C (mm) | D (mm) | E (mm) | F (mm) | G (mm) | H (mm) | Pressure (mwc) | Weight (kg) | Mounting Set |
| 489644 | PS100 | 100 | 250 | 386 | 30 | 97 | 69 | 405 | 50 | 13 | 6 | 11.8 | PSMS-01 |
| 489645 | PS150 | 150 | 300 | 486 | 30 | 97 | 69 | 505 | 50 | 13 | 6 | 15.6 | PSMS-01 |
| 489646 | PS200 | 200 | 350 | 586 | 30 | 97 | 69 | 605 | 50 | 13 | 6 | 18.9 | PSMS-01 |
| 489647 | PS225 | 225 | 375 | 636 | 30 | 97 | 69 | 655 | 50 | 13 | 6 | 22.5 | PSMS-01 |
| 489648 | PS250 | 250 | 400 | 686 | 30 | 97 | 69 | 705 | 50 | 13 | 6 | 24.6 | PSMS-01 |
| 489649 | PS300 | 300 | 450 | 786 | 30 | 97 | 69 | 805 | 50 | 13 | 6 | 29.6 | PSMS-02 |
| 489650 | PS400 | 400 | 600 | 1123 | 30 | 97 | 69 | 1112 | 80 | 13 | 6 | 53.5 | PSMS-03 |
| 489651 | PS500 | 500 | 700 | 1323 | 30 | 97 | 69 | 1312 | 80 | 13 | 6 | 63.4 | PSMS-03 |
| 489652 | PS600 | 600 | 850 | 1535 | 30 | 130 | 68 | 1503 | 100 | 13 | 6 | 91.0 | PSMS-03 |
Installation Guide For Fernco Wall Mounted Penstock
Important: Ensure the installation surface is flat, clean, and structurally sound. The unit must be installed level to achieve a watertight seal. Only trained personnel should carry out installation using appropriate lifting equipment.
Tools & Materials Required
- 12mm masonry drill bit
- Torque wrench (set to 8 Nm)
- Marker pen
- Utility knife
- Hammer
- 17mm socket
- 4mm Allen key and 10mm spanner (for BS cap)
- PPE (gloves, goggles, etc.)
Supplied Mounting Set Includes
- M10 stainless steel studs, nuts, washers
- EPDM sealing tape
- Chemical anchor capsules
- Countersunk anchors (DN300 and above)
Step-by-Step Instructions
- Marking the Mounting Face
- Use lifting equipment to position the penstock.
- Ensure the unit is vertical and level with the pipe invert aligned to the penstock opening.
- Mark all mounting holes using the frame as a template.
- For DN300 and above: fully close the penstock to access upper mounting holes.
- Drilling & Chemical Anchor Installation
- Drill mounting holes using a 12mm bit to 90mm depth.
- For countersunk anchors (DN300+), drill to 40mm and install with an anchor setting tool.
- Clean all holes thoroughly.
- Insert chemical capsules, then drive stainless studs into place using a drill.
- Allow resin to cure per ambient temperature: e.g. 20 min @ 11–20°C, 3 min @ 31–40°C (see full cure table if needed)
- Applying the Sealing Tape
- Cut EPDM tape 20mm longer than required.
- Remove protective film and apply around the wall contact surface of the frame.
- Overlap and square corners precisely.
- Drill through tape at bolt hole locations.
- Apply a second layer if extra sealing is required, overlapping joints.
- Final Fixing
- Place the penstock over the fixed studs.
- Add washers and nuts, tightening by hand first.
- Use a torque wrench to tighten all bolts evenly to 8 Nm in a cross-pattern sequence.
- Ensure countersunk bolts are flush (for DN300+).
- Compress the sealing tape evenly for a watertight finish.
Post-Installation Checks
- Confirm frame is square and aligned.
- Inspect sealing contact for gaps or misalignment.
- Verify bolts are torqued to spec.
- Operate the gate to check smooth movement.
- For units with extension spindles, ensure brackets are aligned and secure.
Maintenance Notes
- Inspect regularly, particularly in aggressive or debris-prone environments.
- Clean with water to remove silt or grit build-up.
- Check for frame or seal damage.
- Tighten bolts as needed.
- Replace the sealing tape if leakage is detected at the mounting interface.
Downloads
If you require any further information, our excellent customer service team is here to help so please call us on 01794 835835.
