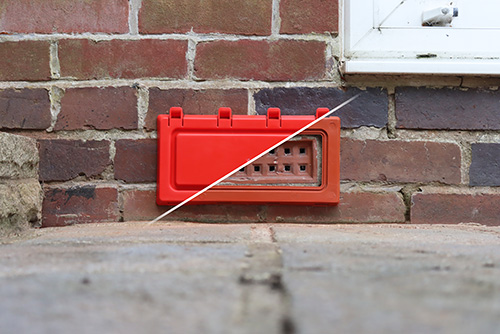
Fernco Anti Flood Air Brick Cover


Technical Specification
- Product Code: AFABC
- Dimensions: W 305mm x H 162mm x D 20mm
- Material: Polypropylene (cover and frame), rubber (seal)
- Colour: Terracotta Frame, Red Cover
- Seal Type: Integrated rubber channel seal
- Installation Type: Surface-mounted with fixings and sealant
- Application: Domestic properties, new builds, retrofits, flood-prone areas
Description
This easy-fit anti-flood air brick cover is a practical, DIY-friendly solution for protecting low-level air bricks from floodwater. Designed for quick deployment during flood events, the cover forms a watertight seal over any standard 9×3 inch air brick, grille, or vent. The system comprises a discreet, terracotta-coloured frame that is permanently fixed to the wall, and a bright red removable cover that clips securely into place when flooding is imminent. The integrated seal ensures full protection without the need for concrete or specialist tools. Once floodwater subsides, the cover can be unclipped and stored until required again.
Key Features
- Flood protection for existing 9×3 inch air bricks
- Surface-mounted permanent frame with removable cover
- Bright red clip-on cover acts as a visible reminder to remove after flooding
- DIY-friendly: no specialist tools, expertise, or concrete required
- Integrated rubber seal ensures watertight performance
- Can be easily removed, cleaned, and reused
- Suitable for use in property flood resilience plans
- Compact design for convenient storage
- Extra-strong retaining clips for added durability
- Compatible with brick, grille, and vented openings
Installation Guide For Fernco Anti Flood Air Brick Cover
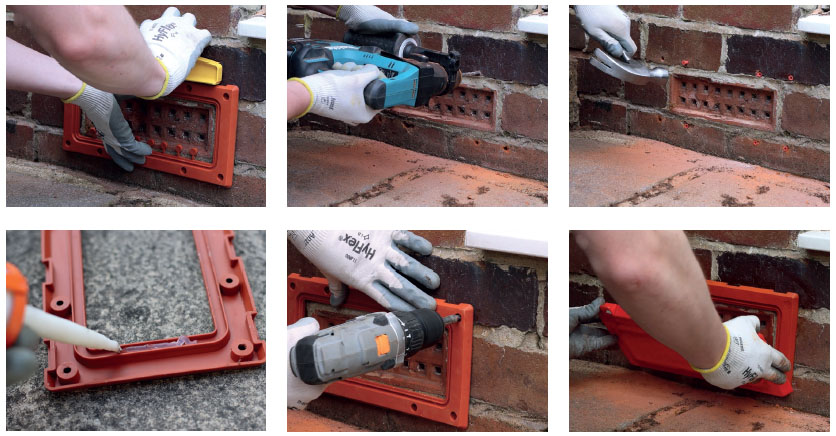
Important: The air brick cover must be installed carefully to ensure a watertight seal. Suitable for most standard 9×3 inch air bricks, this product is ideal for use as part of a flood resilience strategy.
Tools & Materials Required
- Power drill
- 5.5mm masonry drill bit
- Screwdriver
- Suitable external-grade sealant
- Marker pen or pencil
- Brush or cloth (for cleaning surface)
- PPE (gloves, goggles, etc.)
Supplied with Product
- Cover frame (terracotta)
- Removable cover (red)
- Screws and wall plugs
- Screw hole caps
Step-by-Step Instructions
- Identify & Prepare the Area
- Locate the existing air brick or grille to be protected.
- Ensure the wall surface is clean, dry, and free of loose material.
- Mark Drill Points
- Position the cover frame over the air brick.
- Use it as a template to mark the drill holes for mounting.
- Remove the frame after marking.
- Drill the Wall
- Using a suitable masonry bit, drill all marked holes to the appropriate depth.
- Insert the supplied wall plugs into each hole.
- Seal the Frame
- On the reverse side of the frame, apply a continuous bead of sealant in the channel grooves.
- This helps compensate for uneven surfaces and ensures a watertight bond.
- Fix the Frame to the Wall
- Align the frame with the drilled holes and press it firmly into place.
- Insert and tighten the screws evenly to ensure a flush and secure fit.
- Cover the screw heads with the supplied caps.
- Fit the Anti-Flood Cover
- Position the red cover by placing its bottom edge into the lower groove of the mounted frame.
- Press the top of the cover to clip it securely in place.
- Ensure the seal is fully engaged for watertight protection.
Post-Installation Guidance
- The red cover should only be fitted during flood risk periods.
- After the flood threat has passed, remove the cover to restore airflow.
- Rinse and dry the cover before storing in a clean, dry location for reuse.
Downloads
If you require any further information, our excellent customer service team is here to help so please call us on 01794 835835.
